Connect to a Windows VPN (pptp) from Ubuntu 8.10 (Intrepid Ibex)
Back in April, I wrote a post about how to connecct your Ubuntu box to a Windows VPN server linking back to another person’s blog explaining the setup. The install itself was pretty bumpy, but ultimately worked. If I recall correctly, the information in that post was mainly for Gutsy Gibbon. After upgrading to Hardy Haron, I was never able to get the VPN working again. I kind of left it like that. Now that I’ve installed Intrepid Ibex, I started working on trying to get VPN to work again. And thankfully after a few hours of work, I got it working in Gnome. I make no assurances that this will work with KDE or any other enviornment. Here is the process.
Assumptions:
-
Connecting to a Windows Server 2003-based VPN with a domain configured with defaults
-
Short/Friendly Authentication Domain Name: XXCompany
-
Username: usera
-
password: passworda
-
VPN host: vpn.example.com
If you click on your network icon -> VPN connections -> Configure VPN, you would expect to be able to click add and start filling in information. From a new, vanilla installation the Add box will be grayed out. This is because a VPN manager has yet to be installed. Open a Terminal and type in
sudo apt-get install network-manager-pptp
If you get a message saying “E: Couldn’t find package network-manager-pptp” you may need to enable more repository locations. Once that package, and any related packages are installed, restart your computer. Then, you’ll be happy to see that the Add button under Configure VPN is now activated.
Click the Add button and for a Windows VPN, leave the server type as PPTP:
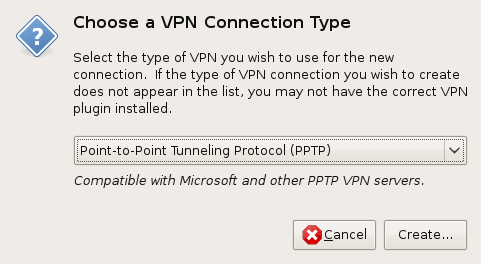
Clicking create brings you to the next screen in which you define your VPN credentials.
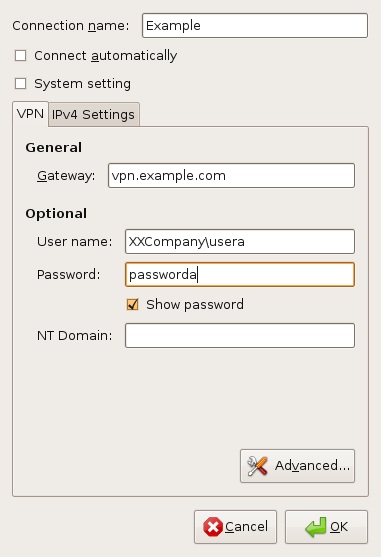
The Gateway is your VPN host. For username, I’ve only got authentication working when the domain name is added to your username in the tradional Windows domain format (<user name>). There may be a different name for that format, but most corporate users should understand that notation. Obviously the show password doesn’t need to be clicked, but for the sake of completeness, I included where the password should go. You can also leave the Password field blank and just enter it every time you start the VPN Connection. I’m sure that this is much more secure. Leave the NT Domain field empty.
Lastly clicking the Advanced will get you to this following screen:
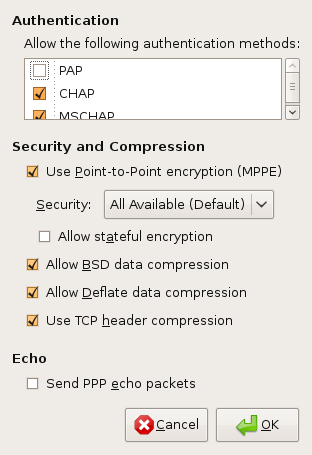
Make sure to uncheck PAP under Authentication Methods as well as check “Use Point-to-Point encryption.”
If everything has gone well, then you should be able to save all your changes and start the VPN up and have it connect. A little lock icon will appear on your connection indicating that a secure VPN connection has been made.
Keep in mind that this method forces all traffic to be tunneled to the VPN host, which means that in the base case, your internet will stop working until you disconnect from the VPN. There must be a way around this, but I have yet to come across it. Enabling the VPN changes your computer’s route table. There is an option under “IPv4 Settings” -> “Routes” that ignore automatically obtained routes, but that doesn’t help in this case, nor is it what we want (I don’t think). If you happen to get an error while attempting to connect to your VPN host, open a terminal and issue this command and watch the log of the attempted VPN connection.
tail -f /var/log/syslog
This proved invaluable to me while trying to configure my VPN client. More information regarding setting up a VPN client within Ubuntu can be located on Launchpad article about VPNCLients.